---
title: 'How to Add Personalized Images to MailerLite Emails (Step-by-Step)'
meta_title: 'How to Add Personalized Images in MailerLite (8 Easy Steps)'
meta_description: 'Add personalized images to MailerLite emails with custom variables. Map subscriber fields to a dynamic image URL and give every subscriber a unique banner.'
excerpt: 'A step-by-step tutorial: map MailerLite personalization variables to a dynamic image URL and send every subscriber a personalized banner - no design tools or code required.'
featured_image: /images/blog/how-to-add-personalized-images-in-mailerlite.png
categories:
- 'Email Marketing'
keywords:
- 'personalized images in mailerlite'
- 'mailerlite personalization variables'
- 'mailerlite custom fields image'
- 'dynamic images in mailerlite'
- 'mailerlite custom html block'
- 'mailerlite personalized email images'
---
[MailerLite](https://www.mailerlite.com) makes personalization easy for text - drop `{$name}` into a subject line or a paragraph and every subscriber sees their own data. But the one element everyone looks at first stays frozen: **the image**. Your header banner is the same JPEG for every subscriber on the list, no matter how rich your custom fields are.
The fix is the same trick that works in every major email platform: instead of uploading an image, embed a **dynamic image URL** that contains your personalization variables - `{$name}`, `{$city}`, whatever your subscriber fields hold. MailerLite fills in the variables per subscriber at send time, and the image renders with each person's data baked in. One banner in your template, a thousand variations in the inbox.
In this tutorial we'll build a personalized nonprofit donation-impact campaign end to end, in eight steps: design the banner in ogdynamic, grab the variables from your MailerLite subscriber fields, map them to the image, and paste the generated HTML into a code block. It takes about fifteen minutes and zero code.
## What You Need
- An [ogdynamic](https://ogdynamic.com) account with a canvas - any size works, but 1200×628 is the sweet spot for email banners
- A MailerLite group with at least one custom field worth personalizing (name, city, plan, coupon code…)
- A MailerLite campaign or template you can edit in the email builder
## Step 1: Design Your Banner
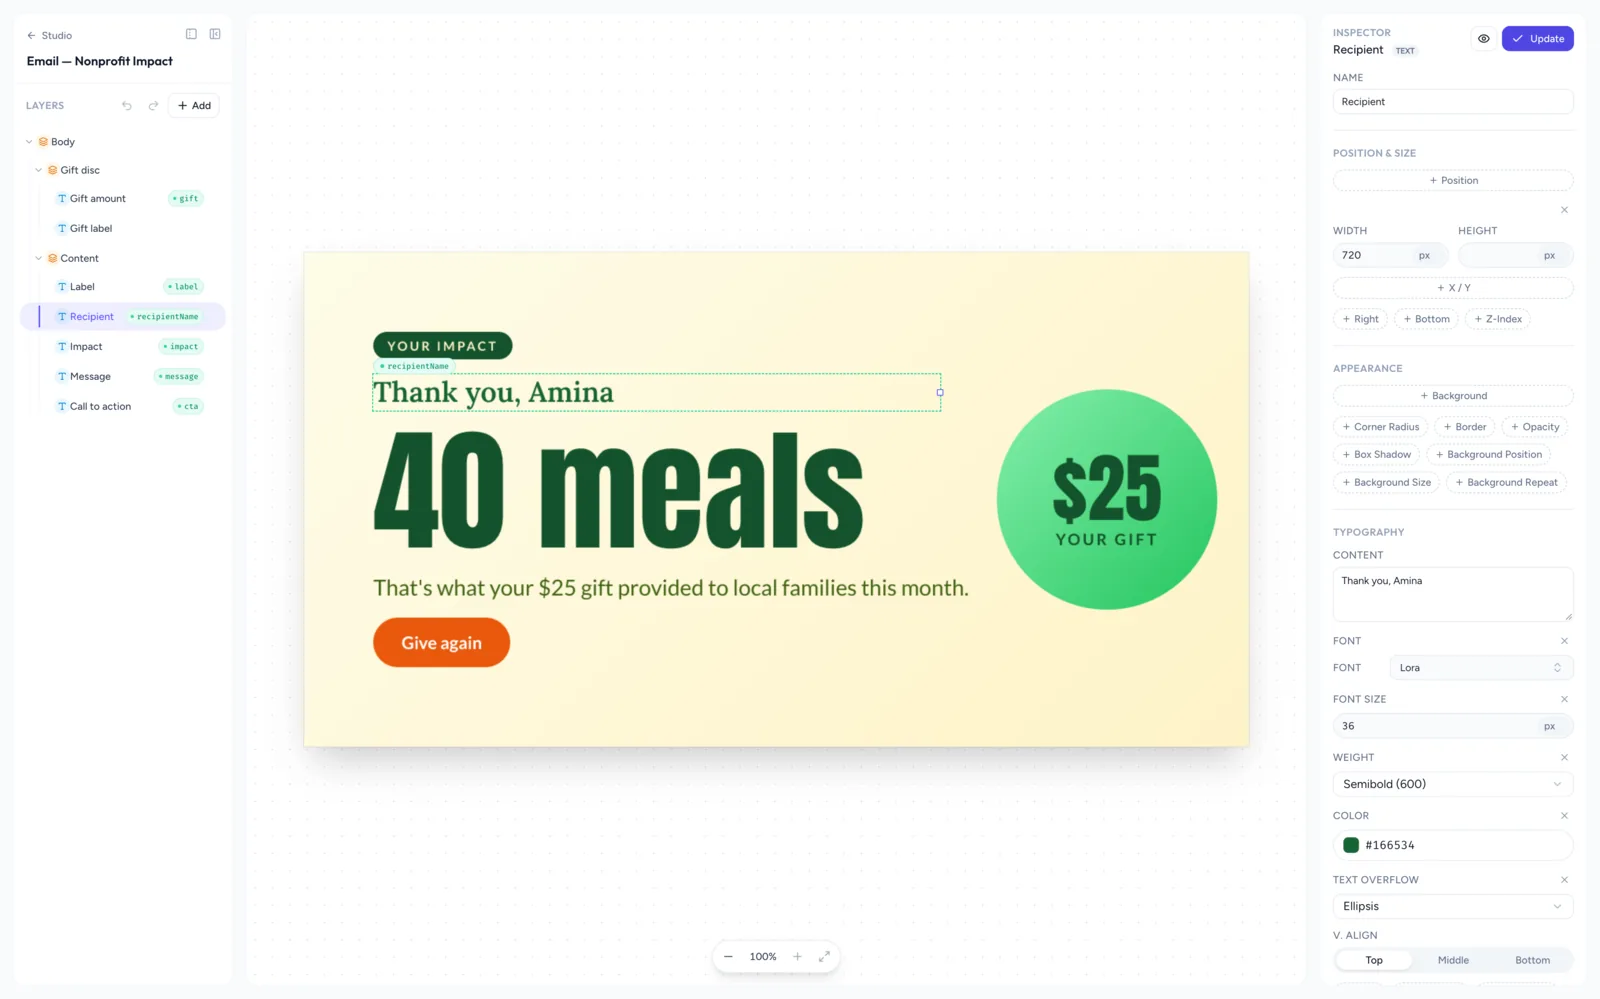
Open the [ogdynamic Studio](https://ogdynamic.com/canvases/create) and design the image exactly as you want it to appear in the inbox. In this example we're building an "Email - Nonprofit Impact" banner: a personalized greeting, a big impact stat, a supporting message, and a call-to-action button beside a gift disc.
Before you get too far in, decide **which text should change per subscriber** and toggle those layers to **dynamic**. In the screenshot above, the greeting layer is marked as a dynamic field named `recipientName` - that's the slot each subscriber's own name will drop into. Every dynamic layer gets:
- a **parameter name** (`recipientName`) that appears in the image URL
- a **default value** ("Thank you, Amina") that renders whenever no value is provided
That default is more important than it looks. It's what shows in the builder preview, in archived campaigns, and for any subscriber whose field is empty - so make it look intentional, not like a placeholder.
## Step 2: Open Subscriber Fields in MailerLite
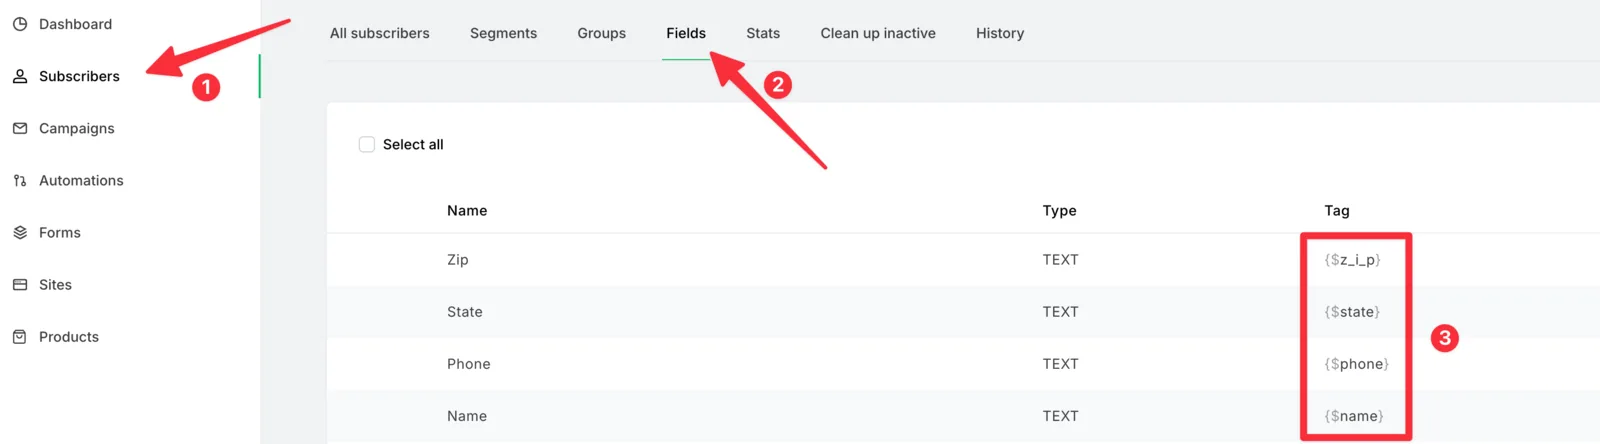
Over in MailerLite, open **Subscribers** from the left sidebar (① in the screenshot above) and switch to the **Fields** tab (②). That's where every field on your subscribers lives - the standard ones like `{$name}` and `{$email}`, plus any custom fields you've created.
If you haven't created the fields you want to personalize with yet, add them here first: give each one a clear, lowercase name (like `city`), because that name becomes the variable you'll use in the next step.
## Step 3: Find the Variables You Need
MailerLite's variables follow one simple pattern: `{$fieldname}`, where the name matches the field in your Subscribers → Fields list. The **Tag column** (boxed as ③ in the screenshot above) lists the exact variable for every field - in this account, `{$name}`, `{$phone}`, `{$state}`, and `{$zip}`. MailerLite documents the full set in their [variables guide](https://www.mailerlite.com/help/how-to-use-variables-in-mailerlite), but the golden rule is simple: **use the tags exactly as the Fields page shows them** - lowercase, underscores for spaces, wrapped in `{$…}`.
Copy the variables for the fields you want in your image - in this campaign, that's `{$name}` for the subscriber's name.
## Step 4: Open the Canvas Integrations Page

Back in ogdynamic, head to [My Studio](https://ogdynamic.com/canvases) and find your canvas card. Click the **Integrations** button on the card (next to "Copy link").
This opens the canvas's integrations page, where the bridge between your design and your email platform happens.
## Step 5: Map Variables and Copy the HTML
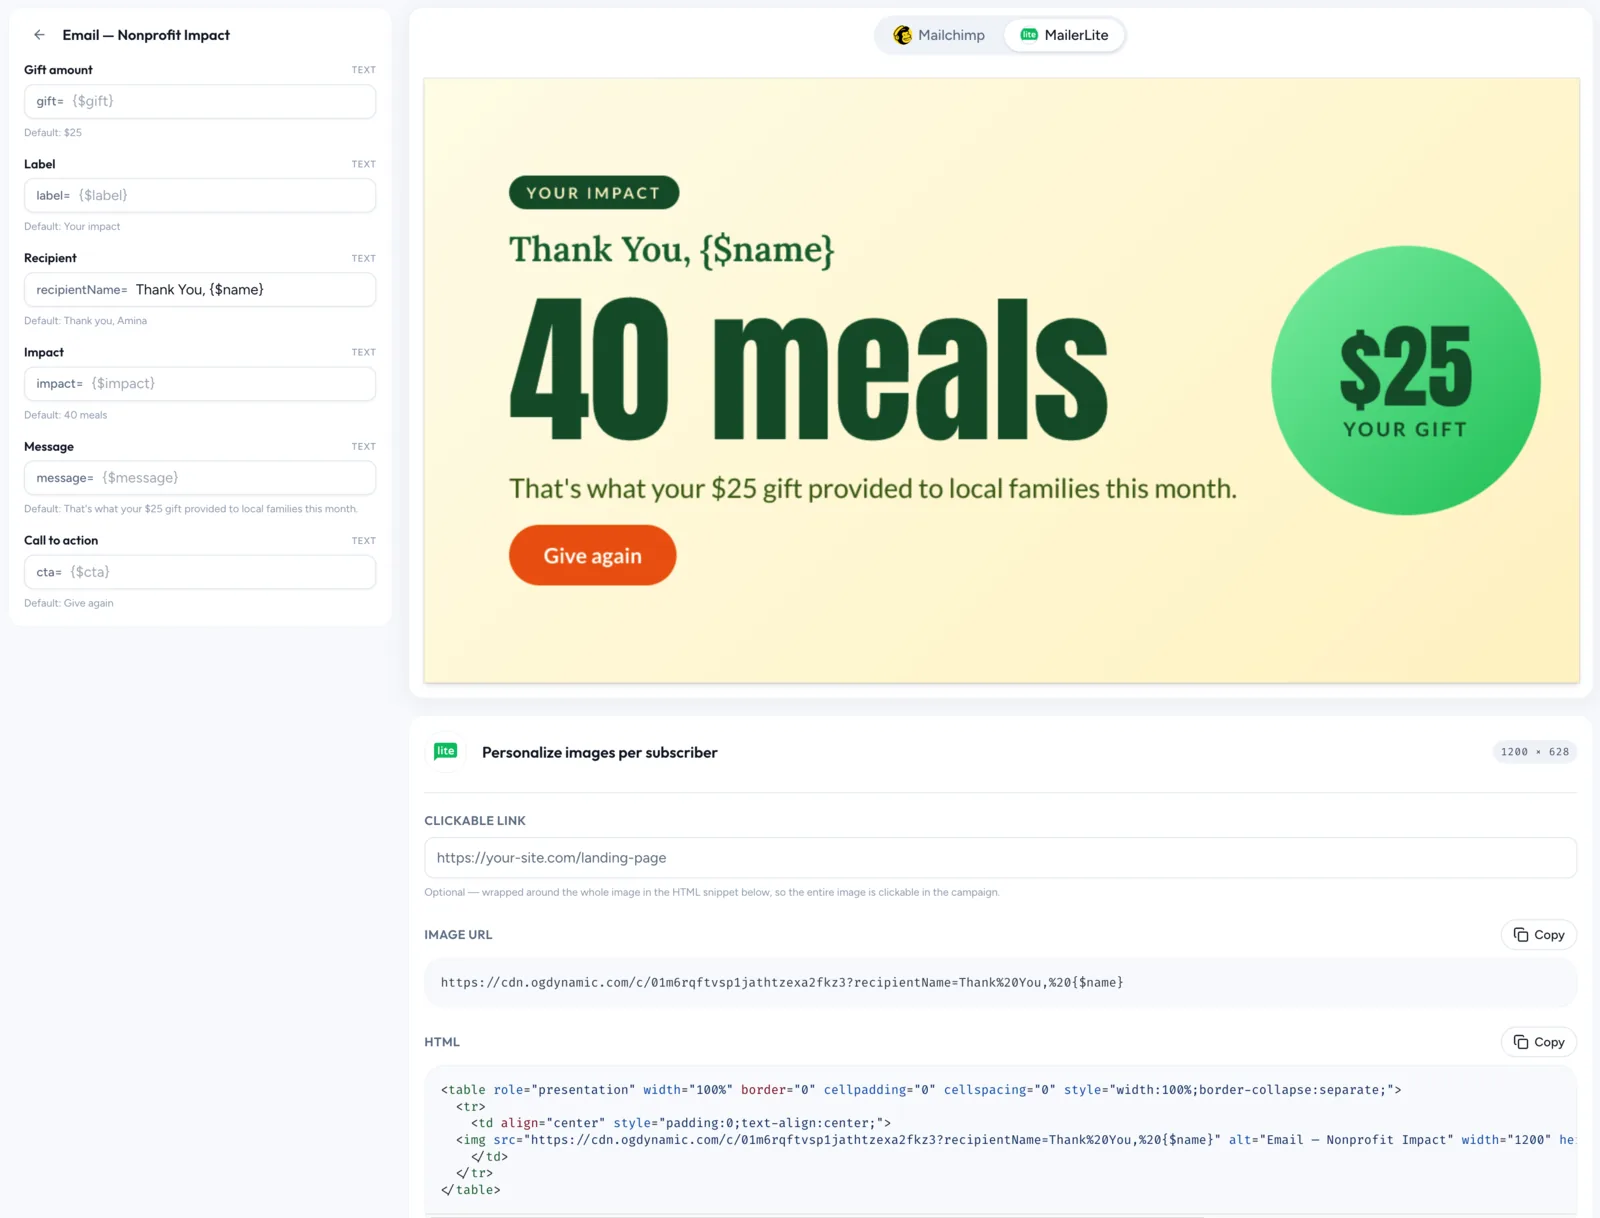
On the **MailerLite** tab, every dynamic field from your canvas shows up with an input for its personalization variable. Paste the variables you copied in step 3, one per field - and note that a mapping can hold more than the bare variable: we typed `Thank You, {$name}` so the greeting renders as a full sentence with the subscriber's name at the end. The live preview re-renders instantly with the raw variables in place, so you can confirm the mapping before touching MailerLite.
Then scroll down to the **Personalize images per subscriber** section:
- **Clickable link** _(optional)_ - a URL wrapped around the whole image, so clicking the banner in the email opens your landing page
- **Image URL** - the dynamic URL with your variables in the query string, e.g. `https://cdn.ogdynamic.com/c/01m6rq…?recipientName=Thank%20You,%20{$name}` (spaces become `%20`; the variables stay literal)
- **HTML** - a ready-made, email-safe table snippet containing that URL
Copy the **HTML** - that's the piece MailerLite needs. If you'd rather place the image with MailerLite's own image block, copy the **Image URL** instead and paste it as the image source.
## Step 6: Add a Code Block to Your Email Template
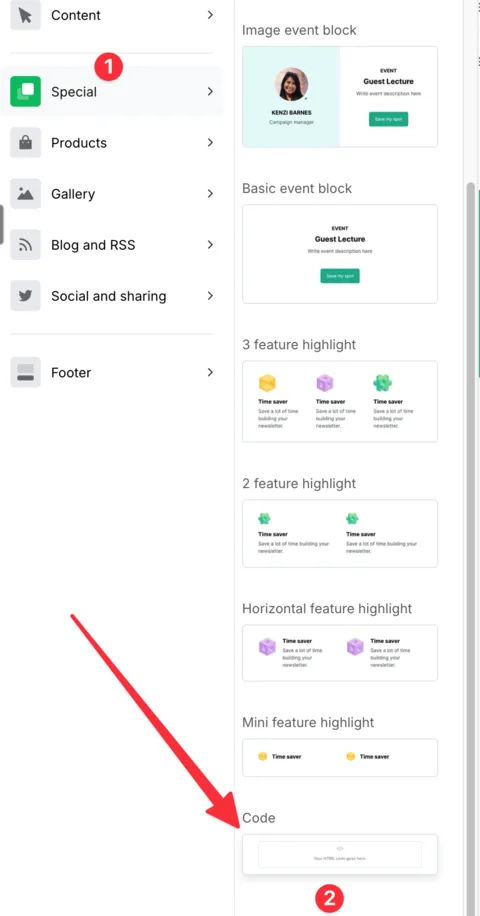
Now open your campaign or template in the MailerLite email builder. In the content blocks sidebar, open the **Special** category (①) and drag the **Code** block (②) into your layout where the banner should appear.
The Code block is what allows raw HTML - and that's what lets variables live inside an image URL. MailerLite's regular image block uploads a static file, so it can't do this. (MailerLite covers the block in their [custom HTML editor guide](https://www.mailerlite.com/help/how-to-use-the-custom-html-editor).)
## Step 7: Paste the HTML Code
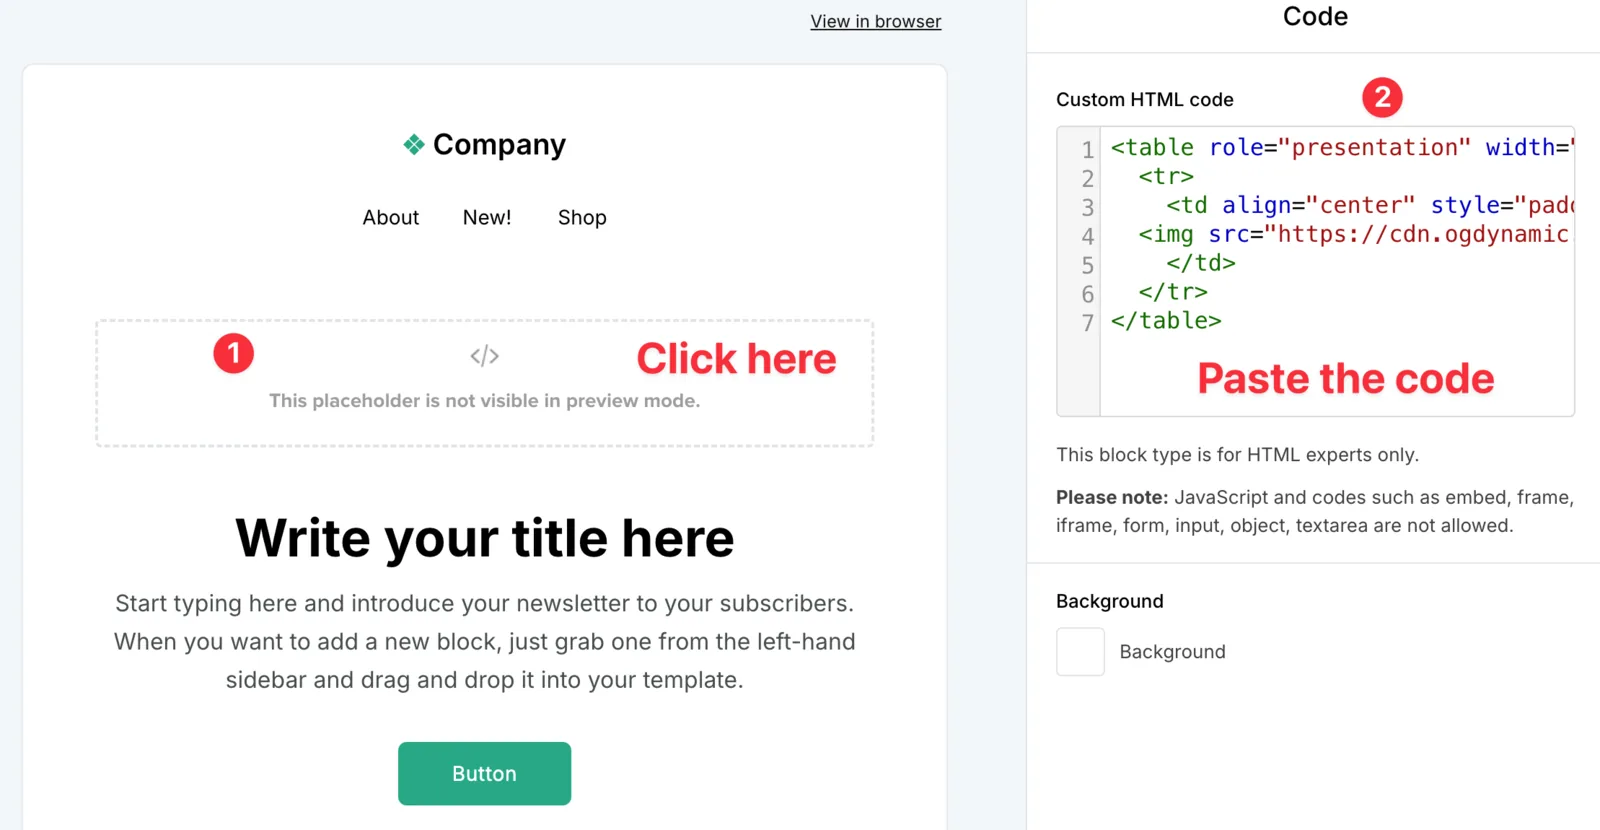
Click the block in your layout, then paste the snippet from step 5 into the **Custom HTML code** editor (② in the screenshot above). Until it renders, the layout shows a placeholder (①) - that's expected: the builder preview doesn't know who "you" are yet.
The snippet is a plain table with an `![]() ` inside, so it plays nice with email clients. There's nothing to style or fix - the width is already set to scale to the template.
## Step 8: Send a Test Email Before You Send
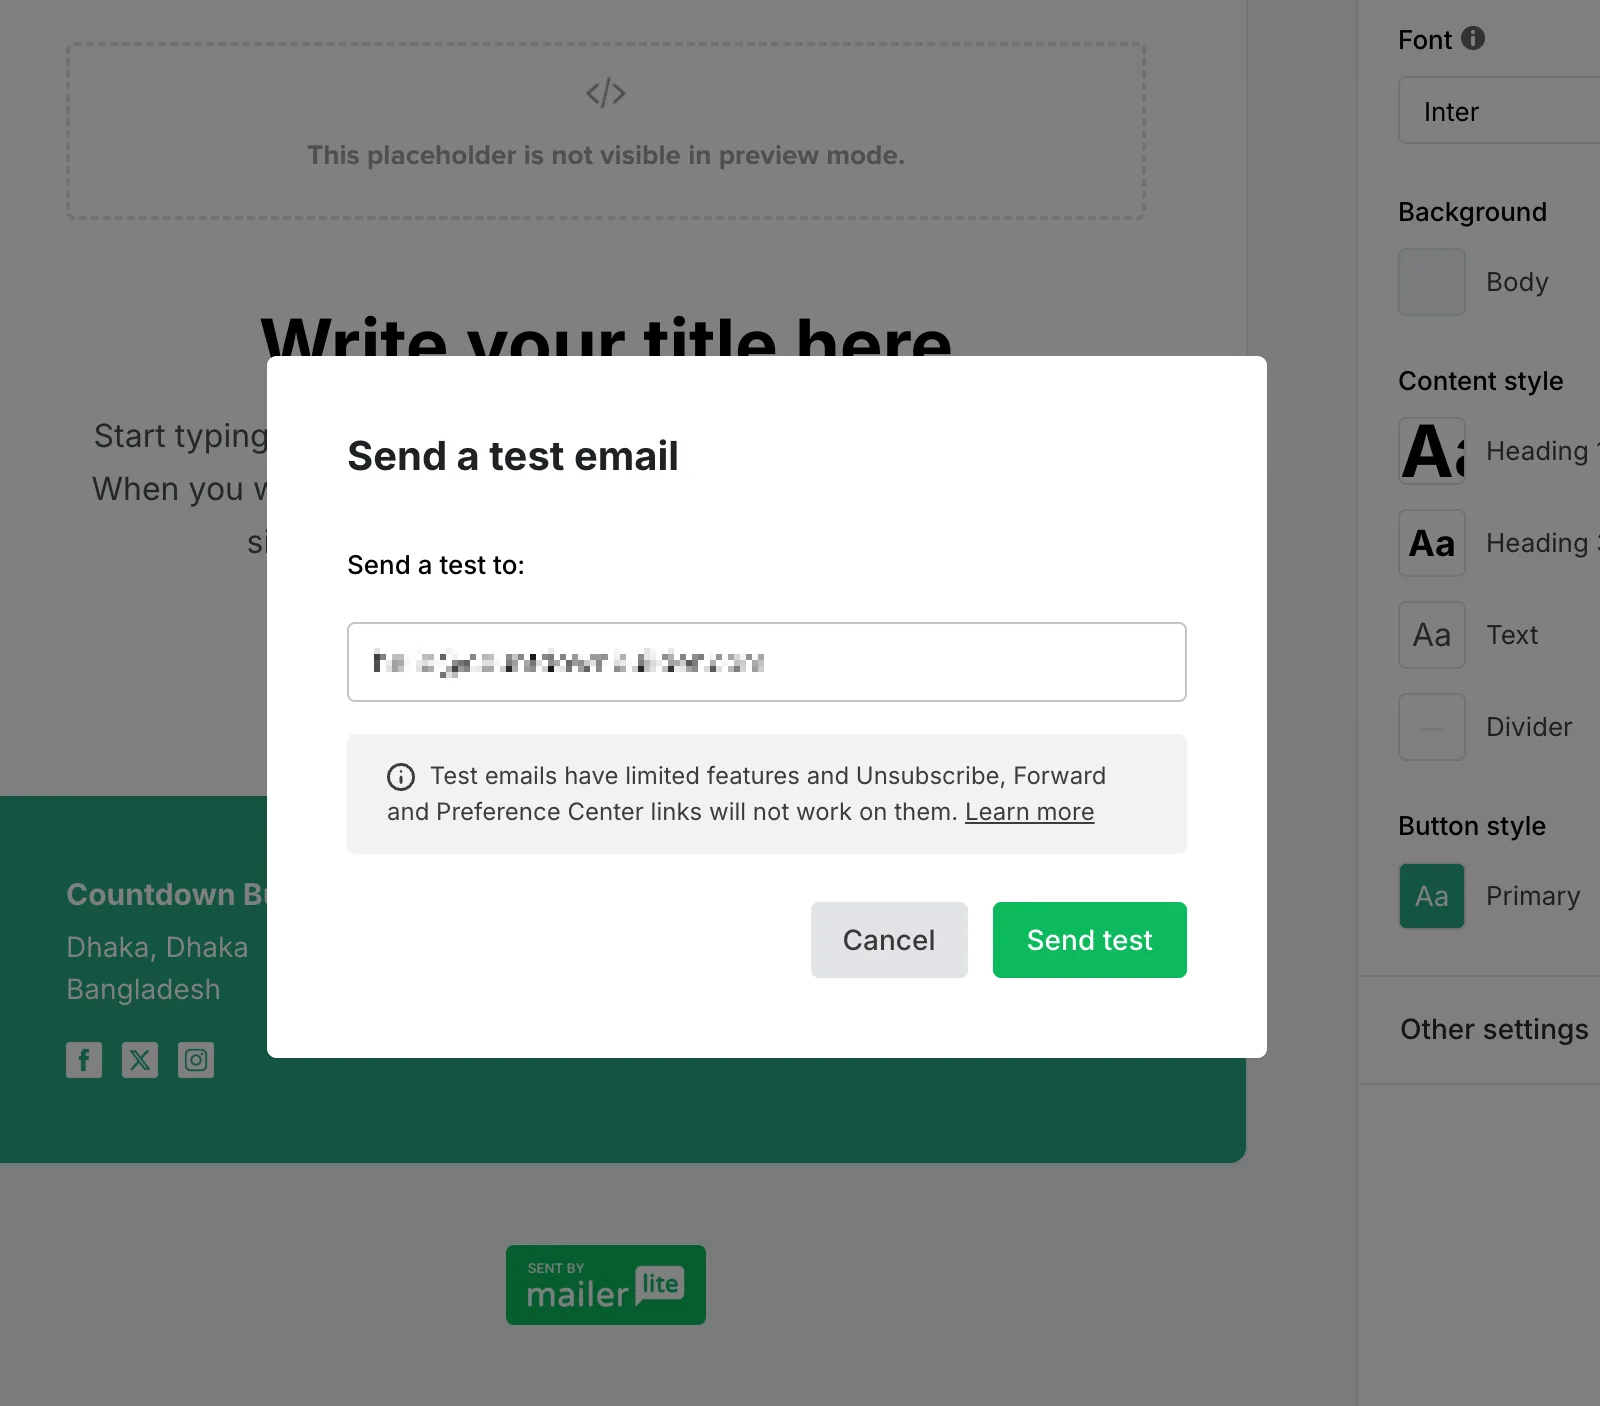
Before you hit send, prove the personalization works. From the builder, use **Send a test email** and send it to yourself:
The test email arrives with the image already personalized to your own subscriber data - the arrow points at the greeting rendered as "Thank You, Mehedi" instead of the designed default:
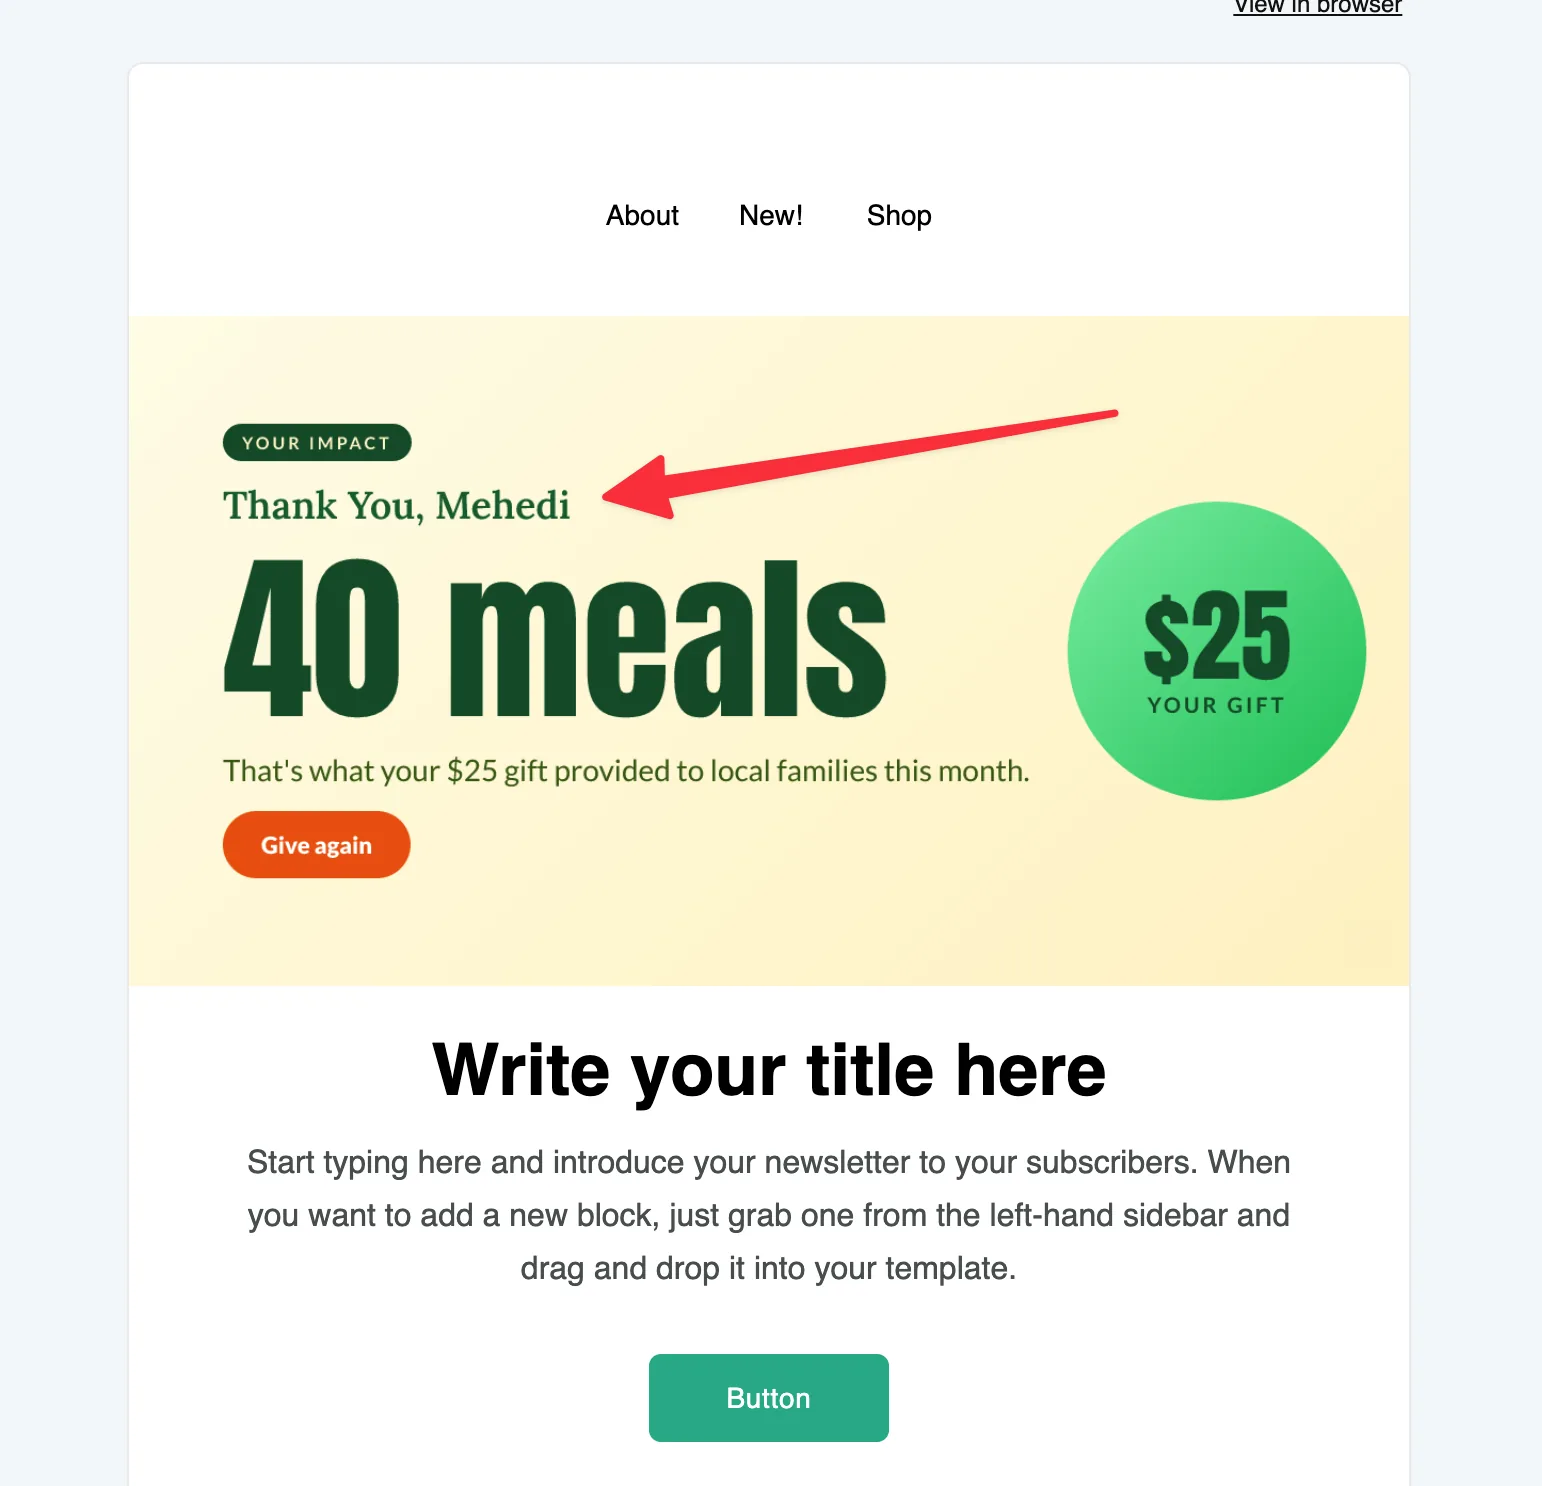
A few things worth checking in the test email:
- **The image actually personalizes.** If you still see the literal `{$name}`, re-check the mapping in step 5.
- **Empty fields fall back gracefully.** Any subscriber missing a field gets the default value you designed in step 1 - never a broken image.
- **The inbox is the final judge.** Test emails have limited features (unsubscribe links don't work), but they show exactly how the banner sits next to your copy.
## Make Every Send Feel Handwritten
That's the whole setup: design once, map your variables, paste one snippet. From here on, every campaign you send with this template renders fresh images per subscriber - new signups, updated fields, and seasonal tweaks included without you exporting anything.
Using Mailchimp too? The same canvas works there - merge tags instead of variables - and we have a matching guide: [How to Add Personalized Images to Mailchimp Emails](https://ogdynamic.com/blog/how-to-add-personalized-images-in-mailchimp). Or skip the theory: [start a canvas](https://ogdynamic.com/canvases/create) and map your first variable in minutes.
## FAQ
**Can MailerLite personalize images per subscriber natively?**
No. MailerLite variables like `{$name}` work in text, subject lines, and links, but a static image can't contain them. The fix is a dynamic image URL: variables go in the image's query string, and the image renders per subscriber at send time.
**Do MailerLite variables work inside an image URL?**
Yes - when the image is embedded through the Code content block (under Special in the builder). MailerLite substitutes variables throughout the campaign's HTML, including the `src` of an `
![]() ` tag, so the image server receives each subscriber's real values.
**What is the variable syntax for MailerLite custom fields?**
`{$fieldname}` - lowercase, with underscores for spaces, matching the Tag column on your Subscribers → Fields page. Standard variables like `{$name}` and `{$email}` follow the same pattern.
**Why does my personalized image show the variable instead of the name?**
You're looking at the builder preview, which has no subscriber data. Open the campaign preview with a test subscriber, or send yourself a test email - real data only appears per actual recipient.
**Why does the variable come through empty in my test email?**
Test emails only personalize when the address you send to is a subscriber in your MailerLite group, and that subscriber has a value stored for the field you're using. If you send a test to an address that isn't on the list - or that subscriber's field is blank - MailerLite passes an empty value into the image URL and the banner renders the designed default instead. Add yourself as a subscriber with your fields filled in, then send the test again.
**What happens if a subscriber's field is empty?**
When a subscriber's field is empty, MailerLite passes an empty value into the URL - and the image renders the default you set for that layer in the canvas editor. That's exactly why intentional defaults matter: they become the fallback design for every subscriber without that field.
**Can I add text around a variable in the mapping?**
Yes. Anything you type around the variable is passed through literally - mapping `recipientName` to `Thank You, {$name}` renders "Thank You, Mehedi" for a subscriber named Mehedi, and falls back to your designed default when the field is empty.